This week in my open source course, I'm starting to teach the students how to use git and Github. I love taking the time to teach it well, because it opens so many doors for students to participate in open source projects, to effectively manage their own software projects, and to quickly join companies that use git in their workflows.
My favourite method for teaching and learning anything technical is to work on a real example. This week I'm going to put a tweet from @mafintosh to the test with my students:
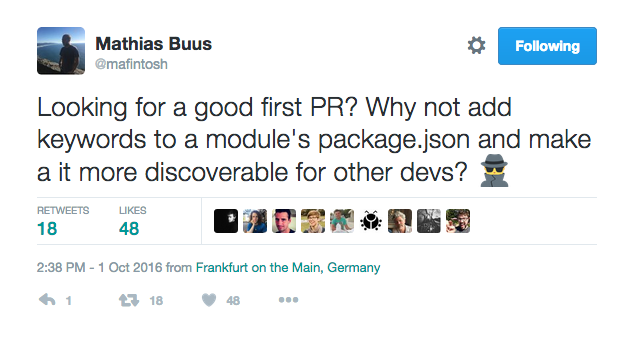
Why not, indeed! To help them get started, I decided to first do this myself, and document all my steps. Let's begin.
Step 1: understanding node.js, npm, and npmjs.com
My first task is to find a node module that needs improving. There are a lot of node.js modules. A lot:
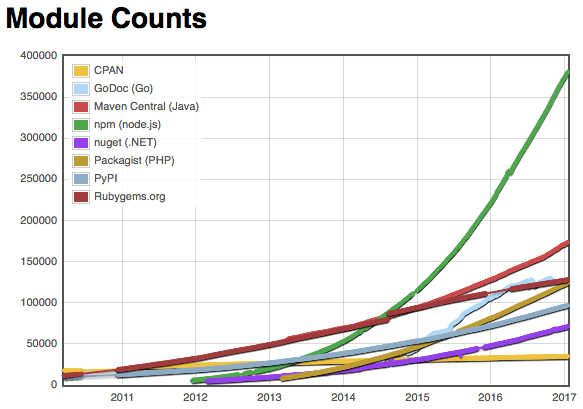
Node.js modules are installed and manged using the Node Package Manager, npm. For the most part, publicly available node.js modules are registered with the online registry npmjs.
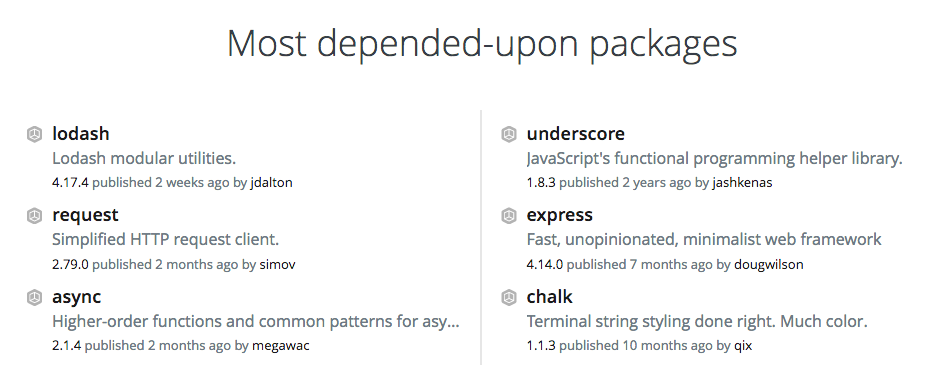
We can use npmjs to search for modules that do something we need, for example, modules that parse Markdown. We can also see popular modules on the front page:
Tools like npm and npmjs rely on metadata about a package stored in a file named package.json.
Step 2: understanding package.json
You can read a complete description of package.json at https://docs.npmjs.com/files/package.json.
A package.json file has to be valid JSON, and must include a few fields. However, many of the fields are optional. Let's look at some examples from popular node.js open source projects:
- forever: https://github.com/foreverjs/forever/blob/master/package.json
- expressjs: https://github.com/expressjs/express/blob/master/package.json
- request: https://github.com/request/request/blob/master/package.json
- commander: https://github.com/tj/commander.js/blob/master/package.json
These package.json files have some common elements, such as:
- a name
- a description
- a version
- a license
There are also some optional fields you can include, for example:
- a list of keywords
- a homepage URL
- repository info
- where to file bugs
Providing good metadata makes it easier for developers to find and use node modules.
Step 3: find a node.js module to improve
You might think that it will be hard to find a node.js module that needs help with its package.json file. Surely any minor issues like this will have been noticed and fixed by other developers already, right?
It turns out that no matter how experienced you are as a developer, we all make errors of omission, forget to do things, and write code that's just plain wrong lots of time. When you're new to contributing to open source, you might feel like you're different from everyone already contributing. The truth is we all need help, we all make mistakes, and we all have lots we can contribute. Don't be intimidated!
To prove this to you, I'm going to fix a bug in one of the most depended upon modules in the node ecosystem, the HTTP request client.
Step 4: identify the bug
I'm using the word "bug," which might sound overblown to you. The "bug" we're going to fix isn't causing a security issue, isn't breaking people's servers, and isn't wreaking havoc across the web. When we say "bug" we mean anything that could be improved, fixed, or updated in the code, documentation, website, etc. It's a general way of saying that there's something that needs to be addressed vs. a judgement about the code or code author(s). By calling out this bug we're not making fun of anyone or pretending that we're smarter because we noticed it. Instead, we're doing our part to help improve the state of the ecosystem for everyone, ourselves included.
In the case of request's package.json file, the bug is that it's currently using tags instead of keywords to list the keywords that apply to the package. The effect of this mistake is apparent on npmjs:
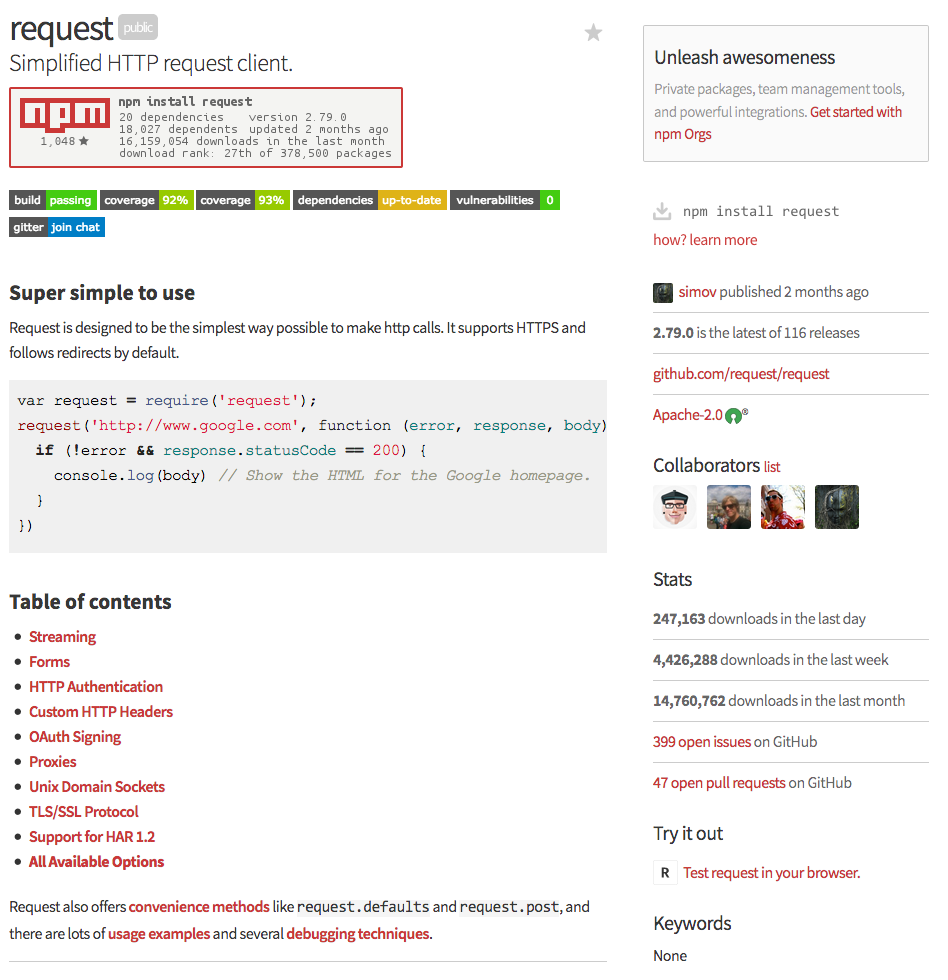
Notice the Keywords section in the bottom-right, which currently lists None instead of the expected ones, namely, http, simple, util, utility
Step 5: is this bug filed already?
Now that we've identified the bug and feel confident that we're right about its effect, we can move on to the next step. We have a few options:
- File a new Issue and let the request developers know about it
- Create a new Pull Request and both identify and fix the bug at the same time
I want to do the latter and fix it, but before I do, I'm interested to see if anyone has already filed this issue, or if someone has a fix up already that just hasn't landed (i.e., been accepted and merged into the main project's code).
I can do a search of the project's Code and Issues for package.json, which, at the time of writing, returns 11 open issues. None of them are about the problem we found. We can also search in the currently open Pull Requests for package.json. At the time of writing this returns 2 PRs, neither of which deals with our bug.
If our bug was filed or already in the process of being fixed, we might have stopped at this point, knowing that someone else is doing the work. We might also have taken note of an existing Issue number, so we could reference it in our eventual pull request.
Step 6: fork the request repo
I want to make a change to request, but I don't have rights to alter the code. I need to begin by making a copy of the repo--a fork--and do my work there.
If I visit the request repo, and am logged into Github, I can Fork it into my own account:

After doing so, Github takes me to my very own copy of the request repo: https://github.com/humphd/request. I have complete control over this version of the repo, and this is where I'll make my fix.
Step 7: fix the bug
In order to fix the code, I need to edit the package.json file in my forked repo. I have two options:
- edit the file using my browser directly in Github
git clonemy repo to my local computer, use my editor to alter the file, and usegittopushmy change back to Github
The second is by far the most common, but it's also the most complicated. Before we do it, I'll quickly show you what the first option would look like.
Step 7a: fix the bug on Github
For this method I start by navigating to the package.json file in my fork. Next I click the pencil icon at the top-right of the file's content view:
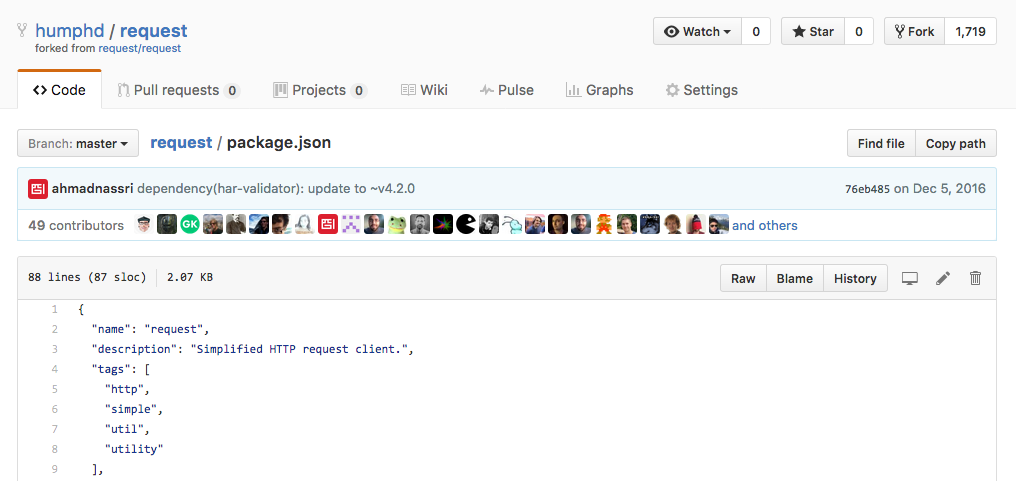
This will open an online editor, where I can change tags to keywords, add a commit message, and even create a new branch and pull request. All that's left would be to click Propose file change:
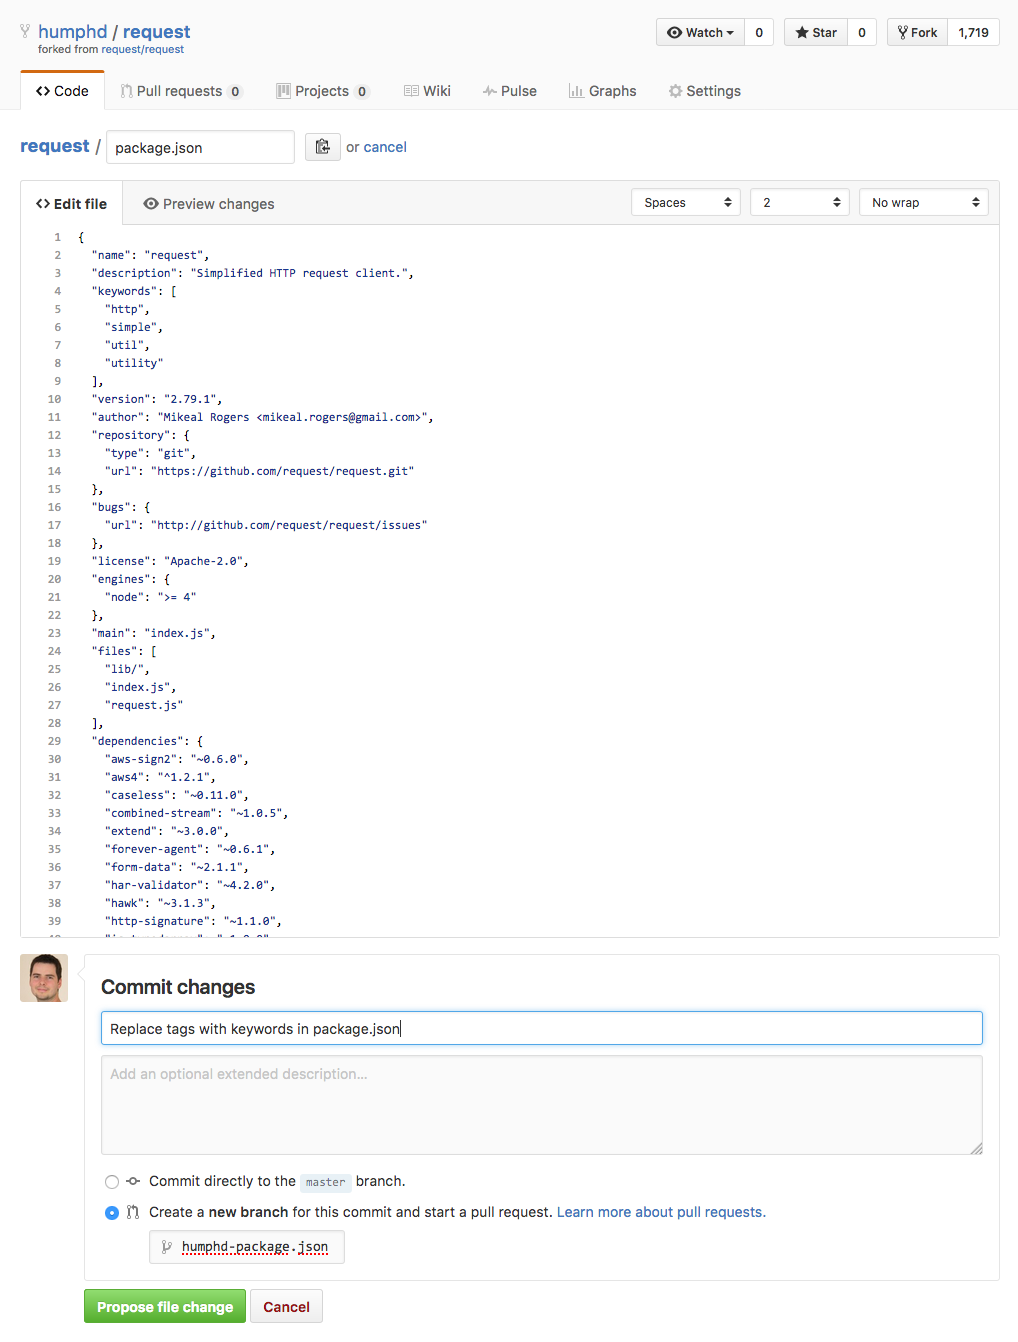
This method will work, but it's not commonly used. Partly because most changes require us to test things locally, run build steps, etc. which we can't do online. For something like a small documentation change, or a quick fix like this, using the online editing features in Github is OK. But it's useful to know how to do things locally using git too, since that's the more common workflow.
Step 7b: fix the bug locally using git
The more common approach to creating a pull request on Github is to clone your forked repo to your local computer, create a branch, fix the bug, commit your code to the branch, then push your branch back to your fork on Github. Simple, right? At first it won't seem like it, but we'll do it slowly below so you can see each step.
I'm going to assume that you've already set up git, created a Github account, have SSH keys created, etc. If you don't, take a few minutes to do that. I've got some notes from class on this you can consult.
We've already forked the request repo on Github, so we can proceed to clone it, like so (note: substitute your Github username where I've indicated below):
$ git clone git@github.com:{github-username}/request.git
Cloning into 'request'...
remote: Counting objects: 7563, done.
remote: Total 7563 (delta 0), reused 0 (delta 0), pack-reused 7563
Receiving objects: 100% (7563/7563), 2.10 MiB | 1.37 MiB/s, done.
Resolving deltas: 100% (4517/4517), done.
We now have a new dir, request/, which contains an exact copy of our forked repo, which is itself an exact copy of the original request repo. At this point it's worth taking a look at one of the files in the repo: CONTRIBUTING.md. This is an optional file that many projects include on Github, and offers info to would-be contributors to the project. One of the things I notice in this file, for example, is that they encourage you to do work on a separate branch--always a good idea with git.
Let's make a new branch for our fix. NOTE: if you're new to branches in git, take a minute to read some docs on the topic. A branch is essentially a name for a commit, a shortcut, as it were, to aid us in referring to our work by something other than a long git SHA.
$ cd request
$ git checkout -b package.json-keywords
Switched to a new branch 'package.json-keywords'
At this point we can finally make our fix to package.json. Use any editor you like, git doesn't care about how you make this change, just its result. When you're done, save the file, and then examine the change from git's perspective:
$ git diff
diff --git a/package.json b/package.json
index f0eaf6c..834d0e0 100644
--- a/package.json
+++ b/package.json
@@ -1,7 +1,7 @@
 {
   "name": "request",
   "description": "Simplified HTTP request client.",
-  "tags": [
+  "keywords": [
     "http",
     "simple",
     "util",
This looks right. We've modified the line that said tags to now say keywords, which git shows as a line removed, and a line added.
Now we can add our changed file and commit on our new branch:
$ git add package.json
$ git commit -m "Change tags to keywords in package.json"
[package.json-keywords 4901f96] Change tags to keywords in package.json
 1 file changed, 1 insertion(+), 1 deletion(-)
When we're done, we can examine what git just did by asking it to show us the most recent commit:
$ git show
commit 4901f968ce0462f38b0cf3c6fbb008ad58414773
Author: David Humphrey (:humph) david.humphrey@senecacollege.ca <david.humphrey@senecacollege.ca>
Date:   Mon Jan 16 16:55:18 2017 -0500

    Change tags to keywords in package.json

diff --git a/package.json b/package.json
index f0eaf6c..834d0e0 100644
--- a/package.json
+++ b/package.json
@@ -1,7 +1,7 @@
 {
   "name": "request",
   "description": "Simplified HTTP request client.",
-  "tags": [
+  "keywords": [
     "http",
     "simple",
     "util",
Our local clone of the request repo now has a new branch with 1 commit, which we'd like to share with the original request repo. We don't have rights to make changes to the original repo, so we'll make a request that they add our changes. Doing so first requires us to get our changes (our commit) added to Github and our forked repo.
To sync the change in our local repo with our fork in Github, we'll use push. When we push we have to indicate the name (or URL) of a remote repo. When we cloned our local repo, git automatically created a remote for us named origin, which refers back to our fork on Github.
In addition to the name of the remote repo, we also need to indicate a branch of commit(s) that we want to push, in this case package.json-keywords--the name of the branch we made locally that has our fix:
$ git push origin package.json-keywords
Counting objects: 3, done.
Delta compression using up to 8 threads.
Compressing objects: 100% (3/3), done.
Writing objects: 100% (3/3), 344 bytes | 0 bytes/s, done.
Total 3 (delta 2), reused 0 (delta 0)
remote: Resolving deltas: 100% (2/2), completed with 2 local objects.
To github.com:humphd/request.git
 * [new branch]      package.json-keywords -> package.json-keywords
Step 8: create a Pull Request
With our fix synced to Github and our forked repo, we can visit our repo on Github and create a Pull Request. Github helpfully shows us any newly pushed branches at the top of our repo, and gives us a button to press in order to create the PR:

Clicking the Compare & pull request button opens a form that we can use to create our PR, including adding notes about what we did. I've also included a screenshot by dragging-and-dropping it into the form, which shows the problem on npmjs. It's often helpful to include screenshots, or even animated gifs showing your bug in action. With this bug it's overkill, but I wanted to make you aware of the process:
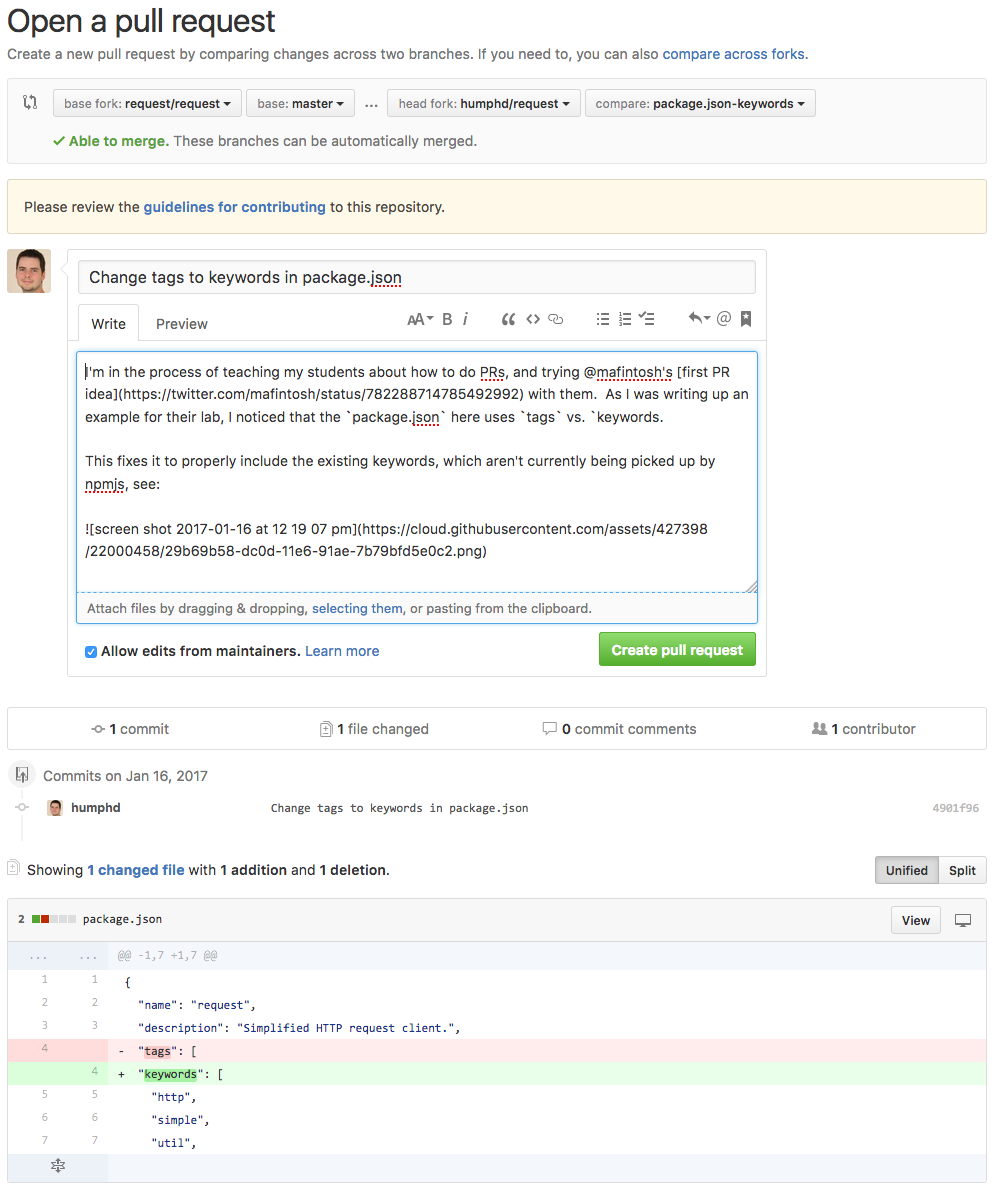
Finally we need to click Create pull request and a new PR will be created in the original request repo (vs. my fork). My PR is now live at https://github.com/request/request/pull/2514, and awaiting a review from someone on the request team.
It's not uncommon for a PR to take days to weeks before it gets attention, so don't be put off if you don't hear back instantly.
When we do hear back, we may be asked to alter what we've done. Perhaps the way we've fixed our bug works, but isn't 100% correct (e.g., maybe we missed a related issue that our fix needs to address at the same time, maybe we need to localize a string, maybe we need to write a test, etc.). In my case, I may discover that something other than npm is reading the tags section of package.json and I need to leave it in.
If and when you are asked to make changes, you can simply update the file(s), commit again to your same branch, and then push your branch to your origin remote...exactly like we did above. Github will simply add more commits to your existing pull request.
Step 9: update your résumé
The last thing you should do is add "Open Source Contributor" to your résumé, because that's what you've now become! Contributing to open source doesn't require you to write huge amounts of code: we just fixed a bug by changing one word. The nice thing is that once you know how the process works, its the same for any size contribution, and you can slowly scale up the size of work you do.