We're getting close to our goal of shipping Telescope 1.0. As you get close to a big release, a few things happen. First, a lot of things suddenly get finished and merges increase (you know the saying, "the last 10% is 90% of the work"). Second, the need for a stable master branch, and functioning staging deployment, becomes more and more critical. We don't want to block all these other merges and need to allow testing to continue.
By now my open source students have spent weeks (months?) listening to me preach my git sermons. And yet I wanted to review a couple of things I've told them in the past, but which only really come to light in a moment like we're in right now. As you move into the final phases of shipping a 1.0, your adeptness at wielding git will mean the difference between victory and defeat. So let me look at a few of the more advanced things I've found myself needing to do this past week on our tree. Specifically:
- How to test your branch against other people's in-progress work
- How to undo something that breaks
masterand staging - How to use git to debug a failure you don't understand
- How to visualize what's happening
Combining Branches Locally for Testing
People are to the point now with git that I can scope work so that we break features up into various parts, and let them progress in parallel. For example, we are doing the "My Feeds" page such that someone works on the tests, someone else works on database changes, someone else works on web routes, someone else does the React frontend pieces, and three or four other people do testing.
We could work bottom-up or top-down, and block everything at the extreme other end until the whole chain is forged. But we don't have time for this, and we need to put all our developers to work at the same time. So we're trying to build things in parallel from the front, back, and middle! But since software breaks at the interfaces, we need to make sure that we can easily test what's going on as soon as possible.
There are different ways to accomplish this with git. One approach is to fetch each others' branches into our local repository, and merge to create a complete system. One of the nice things about branches in git is that they are so lightweight. You can (and should) create branches for all your different lines of work and enquiry. We know about creating topic branches to isolate one change from another; but another way we can use branches is to temporarily sync multiple pieces of work.
Let's say that we have two people, Person-1 and Person-2, and each of them is working on part of a new feature: Persion-1 is doing the tests on a test branch, and Persion-2 is writing the code on an impl branch.
At some point Person-1 gets the tests pretty close to being done, and Person-2 wants to test their work against them. A great way to do this is for Person-2 to fetch from Person-1, create a temporary branch to merge their work with the tests, and try running them:
# On Person-1's computer, add Person-2 as a remote
git remote add person-2 url-to-person-2.git

# Fetch (not Pull) all the work in Person-2's repo we don't have
git fetch person-2

# Create a branch a new branch (impl-test) that points to our work (impl)
git checkout -b impl-test impl

# Merge the work Person-2 is doing in their test branch
git merge person-2/test
What we've done here is create a branch impl-test that combines everything in impl with everything in test. However, we've done it separate to our impl and test branches, so they both remain as they were. We can run our tests, and when we're done, blow it away:
# Go back to our impl branch to keep working
git checkout impl

# Get rid of the temporary impl-test branch
git branch -D impl-test
We can do that process over and over again as the two separate branches progress.
With git there are often multiple ways to accomplish the same thing, and this case is no different. However, this is a fairly simple approach that allows people to test against each other's work without actually merging/rebasing and losing the separate line they are developing.
Undoing a Failure on master
With so many people all working hard to hit a deadline, it's inevitable that something is going to break. Of course it worked locally, and the reviewers didn't see a problem, but once that code hits the staging server, something new flares up.
At this stage of development, we can't afford to have our master branch not build or pass tests, nor our staging box stop working. As a result, we have to be more aggressive with backing-out merges that cause failures.
Git makes this process really easy using the revert command. With revert, you give a commit SHA that you want to "undo" and git will produce a new commit that has the opposite effect: if you added a line to a file, git will remove that line; if you added a file, git will remove that file; if you removed a file, git will add it back. What's so nice about it is that you don't have to do anything by hand: it's all automatic based on the original commit. You run a revert like this:
# Locate the commit that caused the problem using git log:
git log

# Having found the commit you want to "undo", use revert
git revert 2bf0d43afb98204f34f6bb47bff3061b0096bcdc
You'll now have two commits: your original one (2bf0d43afb98204f34f6bb47bff3061b0096bcdc) and a new one that does the inverse. It might seem odd that we "undo" by applying an inverse operation like this. Why not just get rid of the original commit? We could, but remember that we don't want to break master and if I delete a commit from master on the upstream repo, everyone's master branch will break the next time they try and pull. So we add a bandaid to cover something else, and in so doing, keep the line of commits on master moving forward and clean.
One more note about reverting: it's ever so much easier to revert a single commit vs 10 commits. If people squash their commits before they merge, such that a given "change" is represented by a single commit, it's trivial to apply a revert to fix a mess.
Debugging with Git Bisect
I always teach git bisect, but it's very hard to appreciate its value until you really need it. In the previous section I told you how to "undo" a failed commit. But this assumed that we knew which commit caused our failure. How do we determine this if we aren't sure?
Git's memory of the changes we've made to our code is complete. It's the one member of our team that actually knows everything that happened, when it happened, and who did it. When we notice that something has broken, but don't know which change(s) caused it, we can use git's bisect command to help figure out what happened.
On Twitter yesterday I read @dan_abramov writing about a similar idea:
Bisecting is one of the most effective ways to debug problems. Therefore, to onboard someone to a codebase you need to teach them to bisect problems in it. You need to know the layers and their order so you can cut them in half and see where exactly the assumptions failed.
— Dan Abramov (@dan_abramov) April 8, 2020
Perhaps it's counter-intuitive that a large project could sometimes be easier to debug than a small one: with a big project, ignoring the code and focusing on the history of changes can lead to better insights.
I've written about git bisect quite a few times in the past, so I won't go into a lot of detail here, but let's review the basics. We find ourselves in a position where master is broken, or at least not working the way it used to. That last bit is key: things used to work, and now they don't. When did they work last? Like most big projects, we've started to use git tags and GitHub Releases to track regular milestones in our code. Git knows about every commit, but our team tends to think in terms of releases: "I remember that we were working on this in 0.8..."
You know that master is not working (in git bisect terms, we say this commit is bad). We need to find a good commit, and using our tags is a great way to jump back in time. Try looking through all the tags and checking them out to find a good commit (i.e., when the failure isn't present):
# First, get all the tags that are on master
git fetch upstream --tags

# Now look at the list of tags
git tag
0.6.0
0.7.0
0.8.0
0.8.1
0.8.2
0.9.0

# Next, try checking one out and testing it
git checkout 0.8.2

# Repeat until you find a good commit
Once you find a good commit (let's say it's 0.7.0), you're ready to bisect:
# Start a bisect session
git bisect start

# Go to the bad end of the commits and mark it bad
git checkout master
git bisect bad

# Go to the good end of the commits and mark it good
git checkout 0.7.0
git bisect good
Git can now do its work. There might be hundreds (or thousands) of commits between 0.7.0 and master, but it doesn't really matter how many there are: git can divide that list in half, then in half again, then in half again, and find your failed commit in about 8-12 steps. Each time it divides the commits in half, it's going to ask you to test for your bug, and based on your answer, eliminate another half of the commits. How you test depends on the bug, but once you can determine that the bug is there or not, you can let git know with git bisect bad or git bisect good as the case may be.
The amazing thing about bisect is that anyone on the team can use it to debug some regression in the project. You don't have to understand the code at all, nor do you need to be the one to fix it. Often, finding the commit that caused the failure will lead you back to an Issue, Pull Request, code author, reviewers, and related files/lines of code. Armed with this information, you can file a new Issue and CC the relevant people, to let them know what you've discovered. Based on this sleuthing, it's often pretty easy to arrive at a fix.
When you're done bisecting, you use git bisect reset to exit bisect mode and go back to normal.
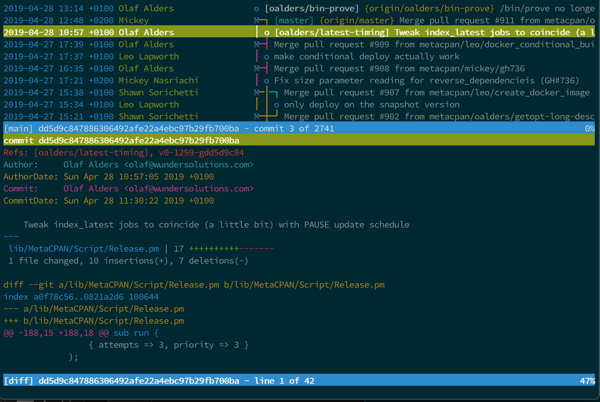
Visualizing git Using tig
The last thing I wanted to mention is something I only learned about this week. While reading Celebrating 15 years of Git: An interview with Git maintainer Junio Hamano, I saw a reference to tig:
As a non-GUI person, good old “tig” (curses based UI for viewing “git log” and running “git blame”, among other features) has always been, and still is, my favorite.
I had never seen it before, and installed it to test. The interface is amazing, bringing a text-based navigation system to git history. It's kind of a mix between using git log and git show in one screen. I found the interface really familiar and very helpful for quickly being able to jump around my git history to understand what has recently happened on a branch or a file.
If found that this was a good article showing how to use
Conclusion
As you get more comfortable with your tools, it's a good idea to review your understanding of how they work, since your abilities now might allow you to do things that seemed too hard in the past. I've been using git for more than a decade, and I'm still learning things about it. You can't know too much.